This page explains how to use the Podcast Video Editor to remove unwanted sections from a recording. The process involves highlighting the sections themselves (via start/end points) and then marking them for deletion during processing.
Select a specific section, or scroll through the guide below (you can also download the PDF guide).
Accessing the editor
Access to the Podcast Editor is via a link which will be emailed to you once a video is ready for editing. There are other ways to access the editor depending on whether it is for an automatic lecture recording, or an uploaded video.
Lecture Recordings
If you opted to hold lecture recordings for your course for editing, aside from a link to the editor which should be emailed to you, you can also access the editor via the Recording Preferences page. In the ‘Recorded Events’ section towards the bottom of the page you will find a link to the editor for any recordings waiting to be edited.
Uploaded videos
From the My Videos page, navigate to the Manage tab and you will see an ‘Edit’ button next to any of your uploaded videos which are waiting to be edited.
The main interface
The image below highlights the different elements available on the main Editor screen.
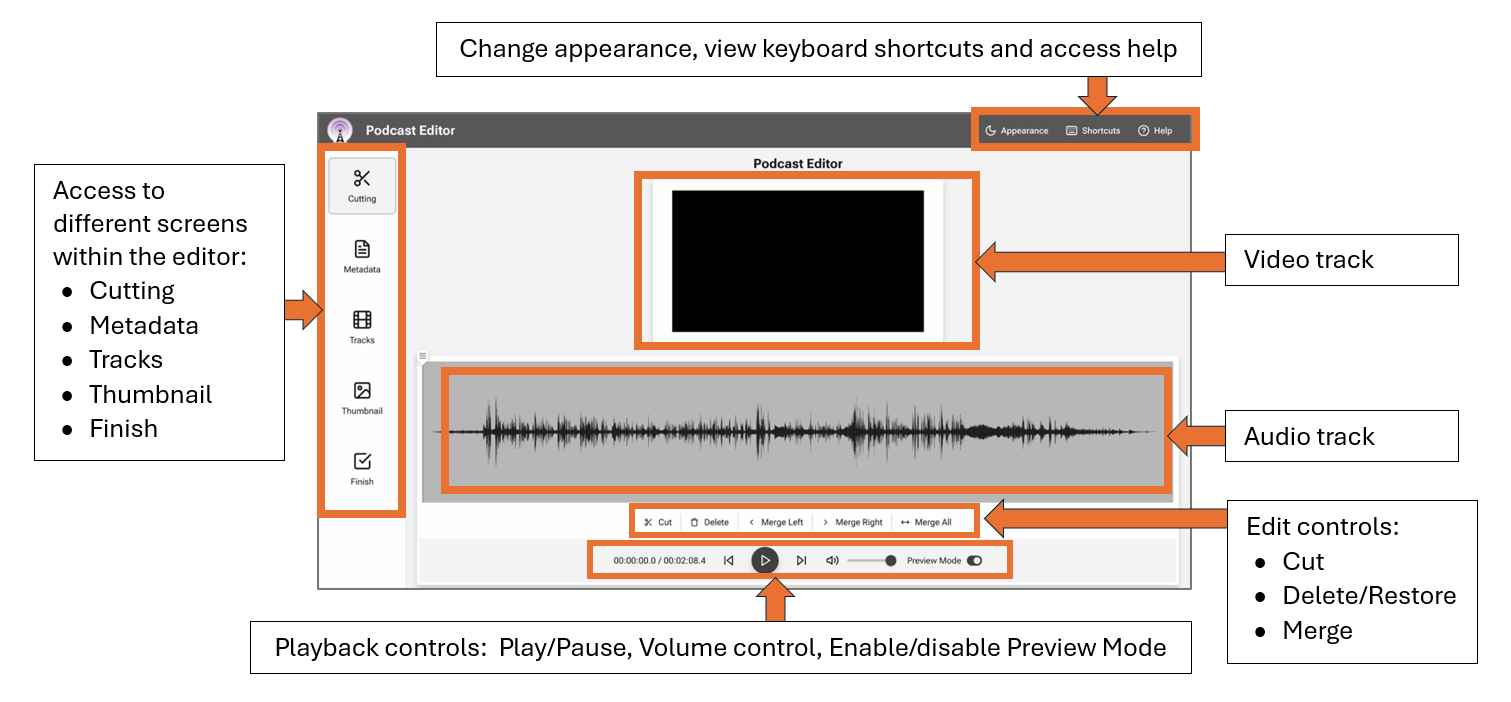
Appearance
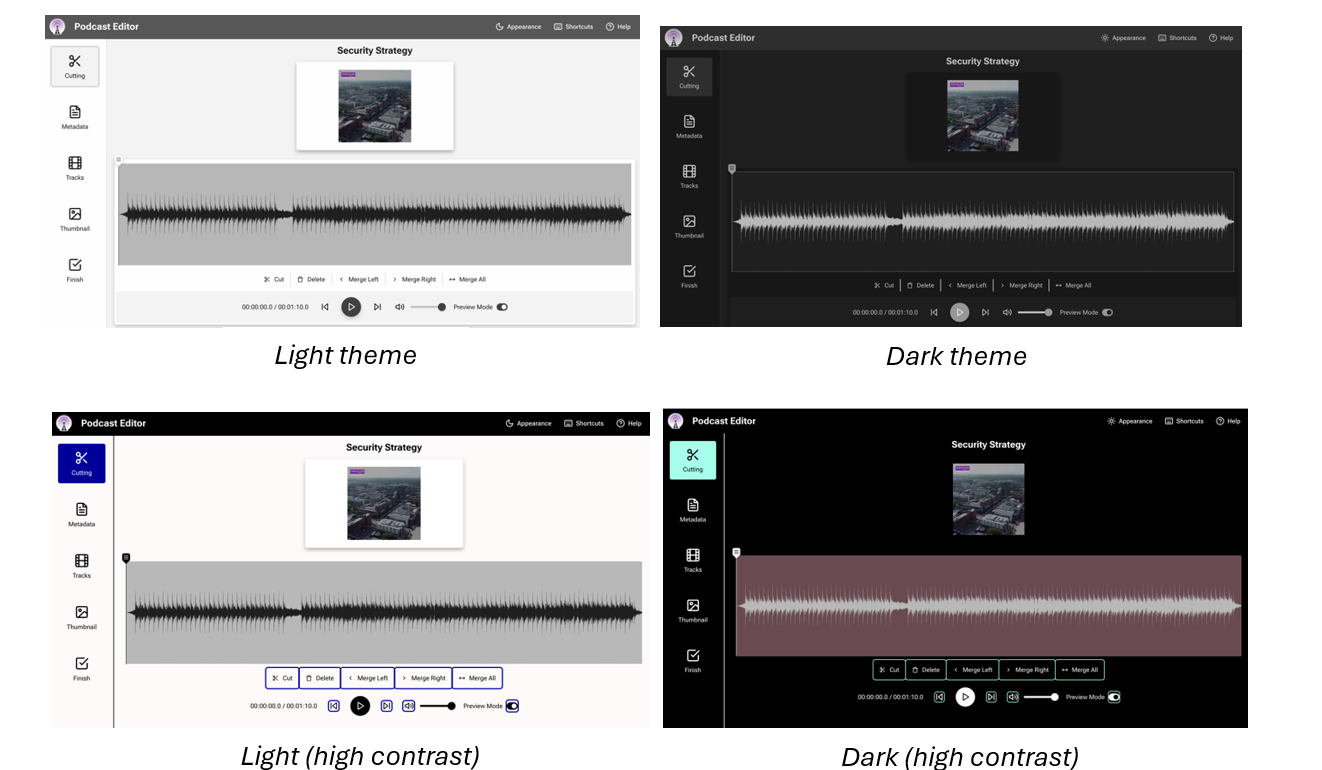
Via this option, you can select the theme for the Editor’s appearance.
Auto: uses the browser theme (dependent on whether it is set to light/dark). Examples of the other options are as shown below.
Shortcuts
You can find a list of key board shortcuts for performing actions via the editor by clicking this option.
Help
Click this option to access this guide at any time.
Cutting screen
On this screen you will mark the sections of videos which need to be edited out (removed) from the published version.
The aim is to separate the sections of the video which need to be removed from the sections which should remain. To mark sections for removal from the video, follow the steps below:
- Play the video, or move the play head, to the start/end of a section which needs to be removed. You can use the keyboard left/right keys to navigate the video (also see the Shortcuts section for useful keyboard shortcuts which can aid in editing).
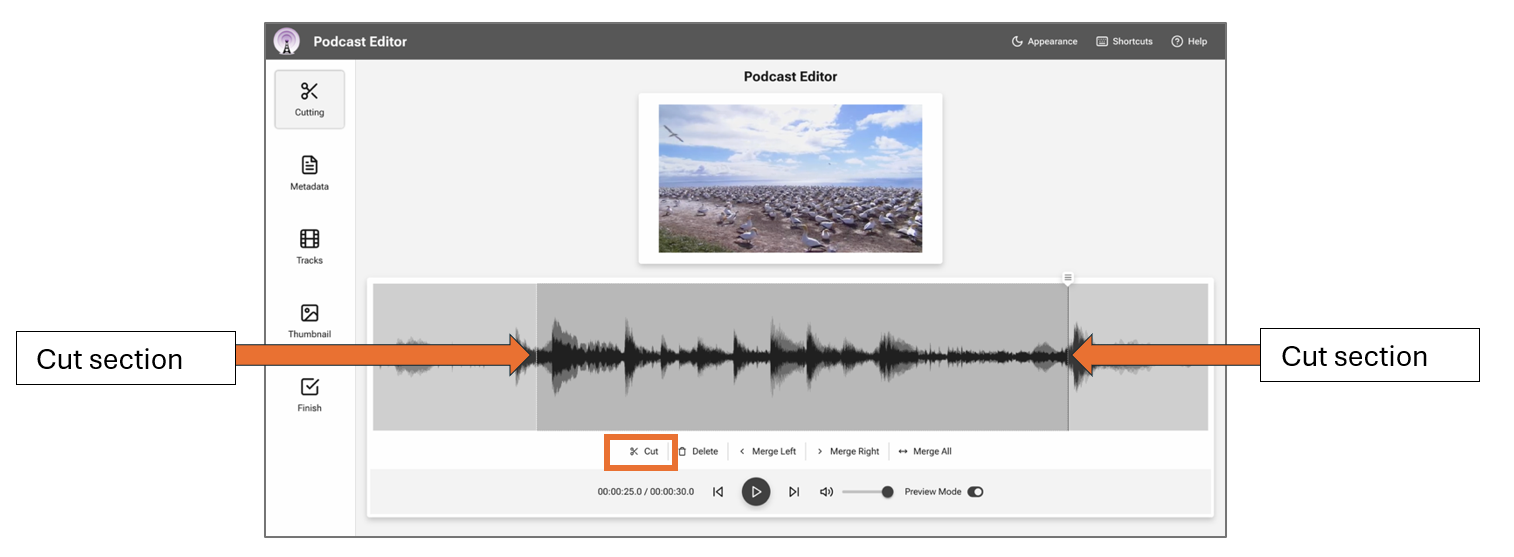
- Press the Cut button to split that section from the main video. The image below shows two sections which have been ‘cut’ from the rest of the video – one at the start and another at the end, indicated by a vertical line on the audio track. Note – at this point, the sections have been marked but not indicated for removal. This will be the next step.
- Click and select the relevant section that needs to be removed from the final video and click the Delete button. This results in those sections becoming red on the audio track to indicate they will be deleted (as shown in the image below).
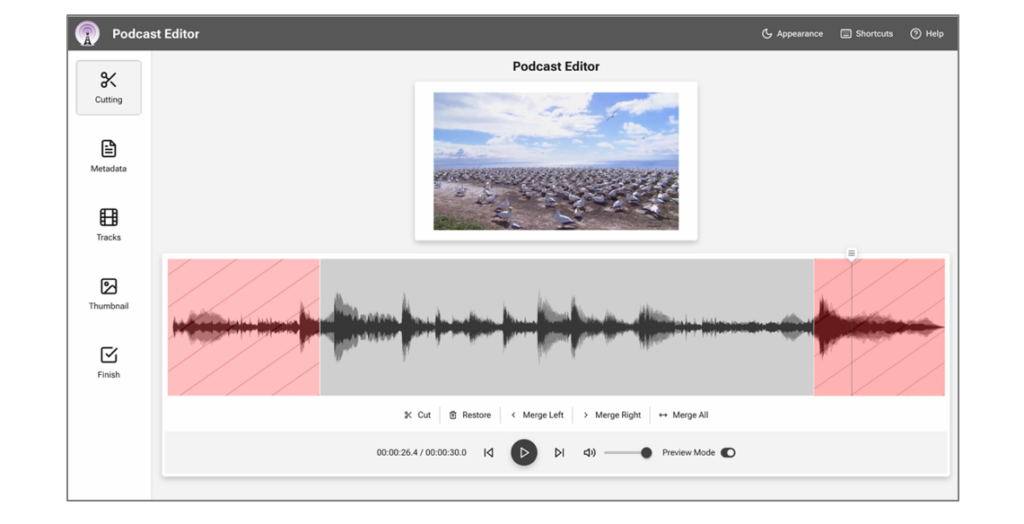
- To undo a section marked for deletion, you can select it on the timeline and then press the Restore button. This will keep the marked ‘cut’ but make the section grey again, to indicate it will not be removed.
- If you wish to remove a ‘cut’ and join two sections back together, select one of the sections on the timeline and then press either the Merge Left or Merge Right buttons appropriately. Pressing Merge All will remove any marked sections and make the video appear as one complete track again.
- The Preview Mode toggle is enabled by default, and it allows you to preview the video within the editor as it would appear after the edited sections have been removed. Essentially, if you play the video in the editor while preview mode is enabled, the video will skip any red sections during playback. Disabling preview mode will leave those sections viewable within the preview window when the video is played back in the editor.
Metadata screen
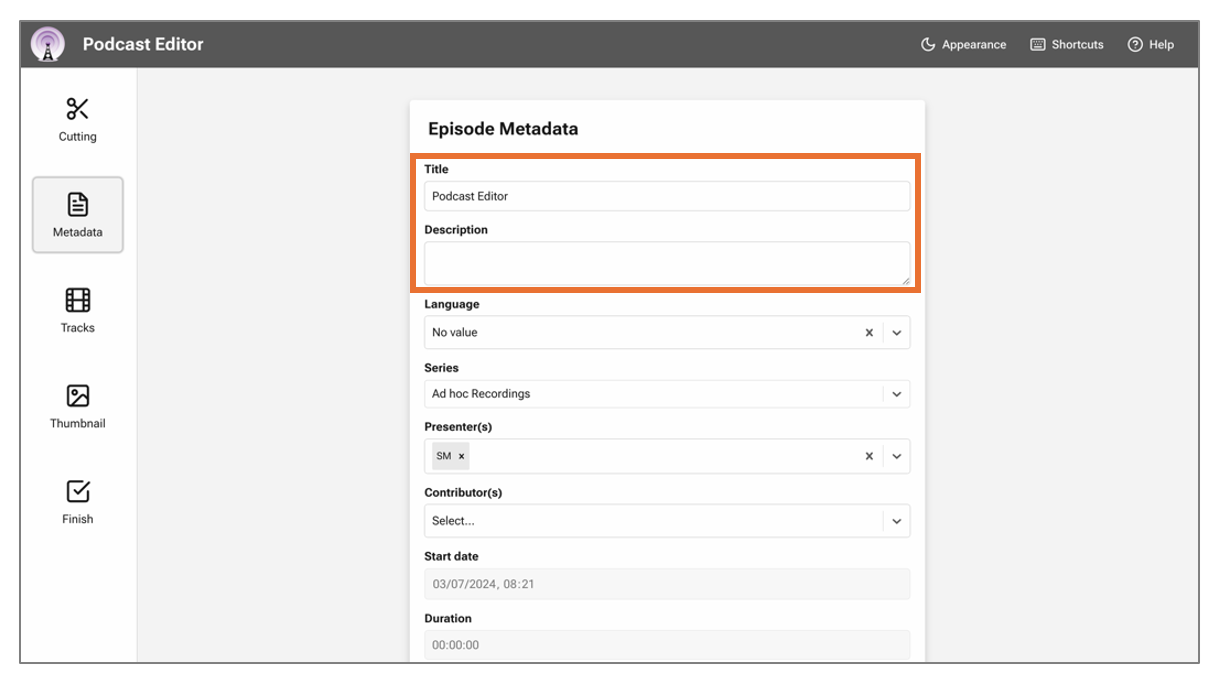
On this screen you can edit the title, description and presenters of the video. Note that many of the displayed fields are not editable and are there for reference. It is not possible to change the area a video will be published to from within the editor.
Thumbnail screen
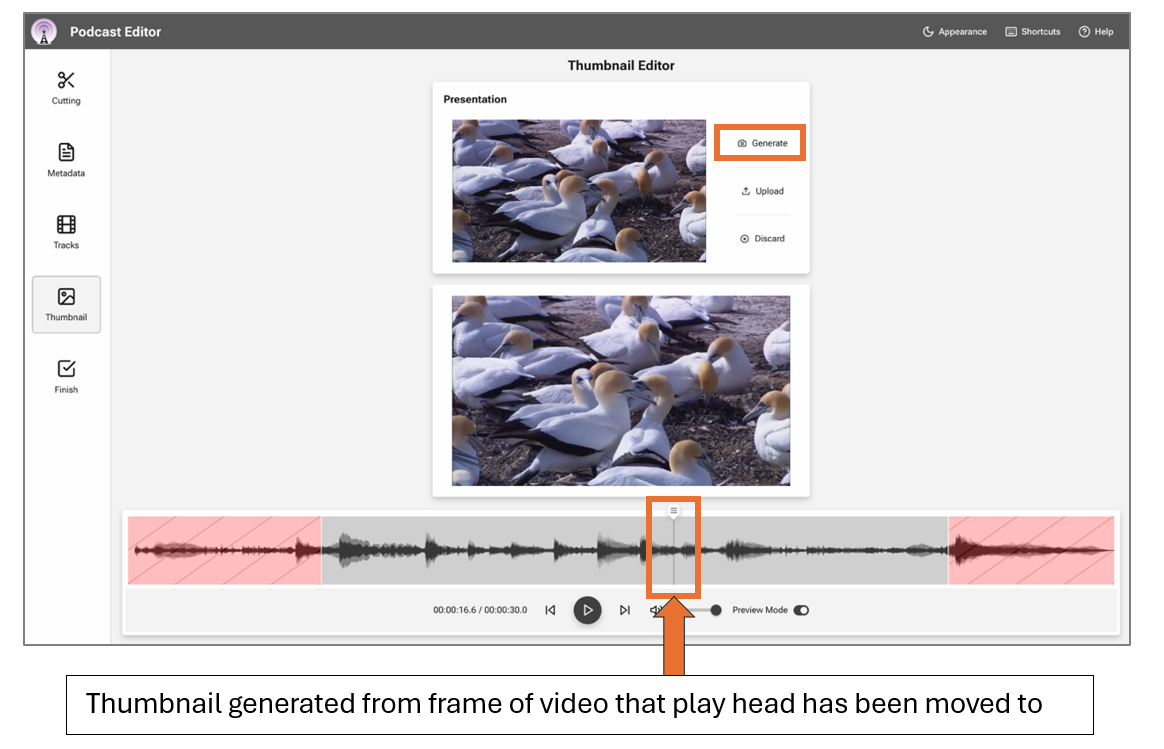
Here you can generate a thumbnail which will be shown for the listing of this video on the Video Portal. You can navigate to a specific frame of the video and generate one from that image, or upload your own.
The image below shows a thumbnail image generated from a specific frame of the video. Note, if you generate an image from a section of the video which is due to be removed (i.e. marked in red on the audio track) then this will be replaced by a generic thumbnail image.
Finish screen
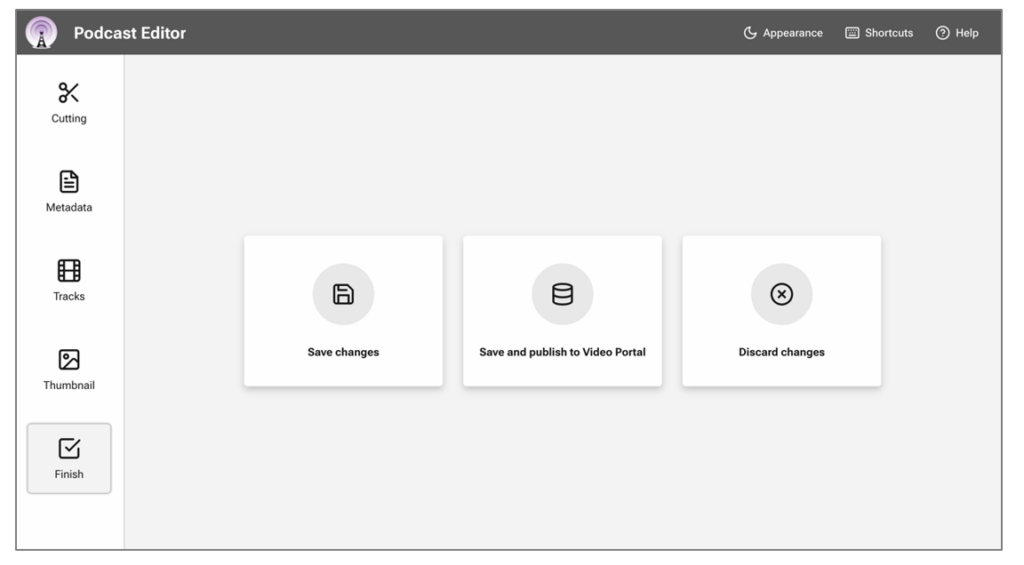
Once all necessary changes have been made, use this screen to save your changes (to be finalised later), submit the video for processing and publishing or discard the edits.
SAVE CHANGES
Any created/deleted sections and metadata changes will be saved within the editor so you can resume editing at another time using your original link.
SAVE AND PUBLISH TO VIDEO PORTAL
All changes are submitted for processing – the system will remove any deleted sections and publish the video on the Video Portal when complete.
Note, you will only receive an email when the video is published if it was one you uploaded via My Videos, lecture recordings do not send notifications on publication but can be found in the relevant course area of the Video Portal.
Video processing times can vary depending on a number of factors but the video should publish within 24 hours. If you do not see your video after 24 hours, you should contact us via podcasting@manchester.ac.uk
DISCARD CHANGES
If you wish to discard any changes you have made and restart editing from scratch, you can click this option and access the editor again at a later time using the original link.
